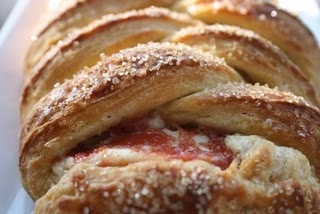
Danish Braid My Daring Bakers First Challenge


First on why I decided to join the Daring Bakers…One evening I was gazing at the photos on Tastespotting (R.I.P), and I saw all of these beautiful layered cakes popping up all over the place. I clicked on one of the photos and it linked to the Daring Bakers, who are a group of crazy cooks who enter a challenge every month to make something out of the ordinary. The May challenge was a Opera Cake..I read through the other blogs and saw that it had something like 14 pages of directions! You have got to be kidding me..14 pages to bake a cake???I was intrigued from the photos..here is one at Addicted Sweet Tooth.

So I just knew I had to join this club so I would be challenged every month to make something I would in no way ever make on my own!

June 2008…my first challenge with the Daring Bakers. Thanks to Kelly of Sass and Veracity and to Ben of What’s Cookin‘? for this wonderful challenge. What did they choose…..

A DANISH BRAID. What the hell is a Danish Braid? A Pastry..oh no a pastry. That meant I was going to have to use those packets of yeast that have been sitting in my pantry for who knows how long! Well the challenge was posted on June 1st, and even though we had one month to complete the it, my obsessive personality took over my whole being. And I had the challenge completed in less than 24 hours! I swear, once I get something in my head, I just cant stop until its done! I actually lost sleep that night trying to figure out what my fillings were going to be in the Braids! Sad, isnt it? Oh well, I guess that makes me who I am!

Here are the lengthy directions as they were provided

DANISH DOUGHMakes 2-1/2 pounds dough
IngredientsFor the dough (Detrempe)

1 ounce fresh yeast or 1 tablespoon active dry yeast

1/2 cup whole milk

1/3 cup sugar

Zest of 1 orange, finely grated

3/4 teaspoon ground cardamom

1-1/2 teaspoons vanilla extract

1/2 vanilla bean, split and scraped

2 large eggs, chilled

1/4 cup fresh orange juice

3-1/4 cups all-purpose flour

1 teaspoon salt
For the butter block (Beurrage)

1/2 pound (2 sticks) cold unsalted butter

1/4 cup all-purpose flour
DOUGH

Combine yeast and milk in the bowl of a mixer fitted with the paddle attachment and mix on low speed. Slowly add sugar, orange zest, cardamom, vanilla extract, vanilla seeds, eggs, and orange juice. Mix well. Change to the dough hook and add the salt with the flour, 1 cup at a time, increasing speed to medium as the flour is incorporated. Knead the dough for about 5 minutes, or until smooth. You may need to add a little more flour if it is sticky. Transfer dough to a lightly floured baking sheet and cover with plastic wrap. Refrigerate for 30 minutes.Without a standing mixer: Combine yeast and milk in a bowl with a hand mixer on low speed or a whisk. Add sugar, orange zest, cardamom, vanilla extract, vanilla seeds, eggs, and orange juice and mix well. Sift flour and salt on your working surface and make a fountain. Make sure that the “walls” of your fountain are thick and even. Pour the liquid in the middle of the fountain. With your fingertips, mix the liquid and the flour starting from the middle of the fountain, slowly working towards the edges. When the ingredients have been incorporated start kneading the dough with the heel of your hands until it becomes smooth and easy to work with, around 5 to 7 minutes. You might need to add more flour if the dough is sticky.
BUTTER BLOCK

1. Combine butter and flour in the bowl of a mixer fitted with a paddle attachment and beat on medium speed for 1 minute. Scrape down the sides of the bowl and the paddle and then beat for 1 minute more, or until smooth and lump free. Set aside at room temperature.
2. After the detrempe has chilled 30 minutes, turn it out onto a lightly floured surface. Roll the dough into a rectangle approximately 18 x 13 inches and ¼ inch thick. The dough may be sticky, so keep dusting it lightly with flour. Spread the butter evenly over the center and right thirds of the dough. Fold the left edge of the detrempe to the right, covering half of the butter. Fold the right third of the rectangle over the center third. The first turn has now been completed. Mark the dough by poking it with your finger to keep track of your turns, or use a sticky and keep a tally. Place the dough on a baking sheet, wrap it in plastic wrap, and refrigerate for 30 minutes.
3. Place the dough lengthwise on a floured work surface. The open ends should be to your right and left. Roll the dough into another approximately 13 x 18 inch, ¼-inch-thick rectangle. Again, fold the left third of the rectangle over the center third and the right third over the center third. No additional butter will be added as it is already in the dough. The second turn has now been completed. Refrigerate the dough for 30 minutes.
4. Roll out, turn, and refrigerate the dough two more times, for a total of four single turns. Make sure you are keeping track of your turns. Refrigerate the dough after the final turn for at least 5 hours or overnight. The Danish dough is now ready to be used. If you will not be using the dough within 24 hours, freeze it. To do this, roll the dough out to about 1 inch in thickness, wrap tightly in plastic wrap, and freeze. Defrost the dough slowly in the refrigerator for easiest handling. Danish dough will keep in the freezer for up to 1 month.
APPLE FILLING
Makes enough for two braidsIngredients
4 Fuji or other apples, peeled, cored, and cut into ¼-inch pieces

1/2 cup sugar

1 tsp. ground cinnamon

1/2 vanilla bean, split and scraped

1/4 cup fresh lemon juice

4 tablespoons unsalted butter

Toss all ingredients except butter in a large bowl. Melt the butter in a sauté pan over medium heat until slightly nutty in color, about 6 – 8 minutes. Then add the apple mixture and sauté until apples are softened and caramelized, 10 to 15 minutes. If you’ve chosen Fujis, the apples will be caramelized, but have still retained their shape. Pour the cooked apples onto a baking sheet to cool completely before forming the braid. (If making ahead, cool to room temperature, seal, and refrigerate.) They will cool faster when spread in a thin layer over the surface of the sheet. After they have cooled, the filling can be stored in the refrigerator for up to 3 days. Left over filling can be used as an ice cream topping, for muffins, cheesecake, or other pastries.
DANISH BRAID Makes enough for 2 large braids
Ingredients
1 recipe Danish Dough (see below)

2 cups apple filling, jam, or preserves (see below)
For the egg wash:

1 large egg, plus 1 large egg yolk
1. Line a baking sheet with a silicone mat or parchment paper. On a lightly floured surface, roll the Danish Dough into a 15 x 20-inch rectangle, ¼ inch thick. If the dough seems elastic and shrinks back when rolled, let it rest for a few minutes, then roll again. Place the dough on the baking sheet.
2. Along one long side of the pastry make parallel, 5-inch-long cuts with a knife or rolling pastry wheel, each about 1 inch apart. Repeat on the opposite side, making sure to line up the cuts with those you’ve already made.
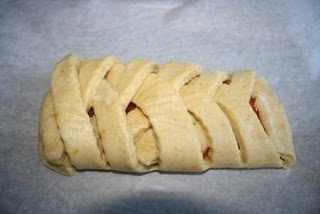
3. Spoon the filling you’ve chosen to fill your braid down the center of the rectangle. Starting with the top and bottom “flaps”, fold the top flap down over the filling to cover. Next, fold the bottom “flap” up to cover filling. This helps keep the braid neat and helps to hold in the filling. Now begin folding the cut side strips of dough over the filling, alternating first left, then right, left, right, until finished. Trim any excess dough and tuck in the ends.
Egg Wash

Whisk together the whole egg and yolk in a bowl and with a pastry brush, lightly coat the braid.
Proofing and Baking

1. Spray cooking oil (Pam…) onto a piece of plastic wrap, and place over the braid. Proof at room temperature or, if possible, in a controlled 90 degree F environment for about 2 hours, or until doubled in volume and light to the touch.

2. Near the end of proofing, preheat oven to 400 degrees F. Position a rack in the center of the oven.

3. Bake for 10 minutes, then rotate the pan so that the side of the braid previously in the back of the oven is now in the front. Lower the oven temperature to 350 degrees F, and bake about 15-20 minutes more, or until golden brown. Cool and serve the braid either still warm from the oven or at room temperature. The cooled braid can be wrapped airtight and stored in the refrigerator for up to 2 days, or freeze for 1 month
My Fillings:

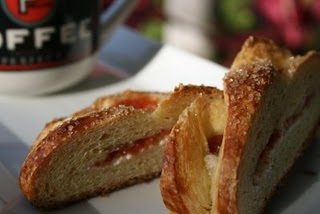
Guava and cream cheese

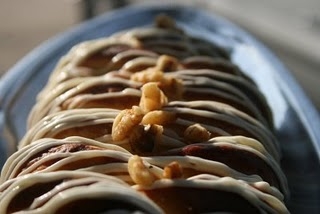
Maple Cinnamon cream cheese frosting
I have no idea on how many photos I took of these bad boys..but it was a TON

So here are a few of them!!

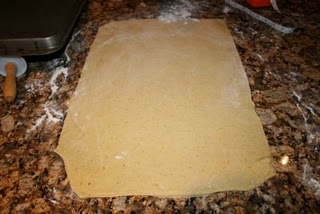
Rolling out the dough

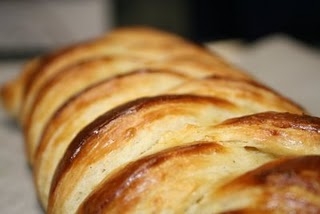
Before the oven


FRESH OUT OF THE OVEN

Maple Cream cheese all dressed Up

As you can see I needed more filling..I will know for next time!

With the extra scraps of dough, I made this little plate for my hubby for when he got home!


Check out all of the other wonderful braids on the Daring Bakers Blogroll!
Comments

  1. noble pig says:

    It’s beautiful!

    You Know Tastespotting is back…however they now have an agrrement clause that says they basically own your photo and you have no rights to them.

    I think I’ll stick with foodgawker.com. It’s really not worth it to give away the right’s to your work.

  2. Bridgett says:

    Leslie, you did a beautiful job!! One look at the never-ending directions would have turned me right off from trying this, so kudos to you for sticking with it. It looks perfect. Is there any left? 😉

  3. Wonderful job for your first challenge! Your kitchen will smell of sugar and butter too!! Elga

  4. ya done good–it looks perfect! i could probably eat half a loaf in one sitting…and promptly lie down for a couple hours. 🙂

  5. Judy @ No Fear Entertaining says:

    Yummmm. That looks incredible!!!

  6. Clumbsy Cookie says:

    Lol I love the one that says “eat me”! I did great joining the DB! I love the look of your braid, so professional!

  7. Awesome job!

  8. Michelle says:

    Gorgeous braids and I love the little danish, such a cute idea!

    Welcome to Daring Bakers!

  9. noble pig says:

    Update on my previous comment. Tastespotting removed their Public Domain clause so post away! Yeah!

  10. I love the maple cream cheese choice, great job everything looks beautiful!

  11. emacgrass says:

    yum, it looks gorgeous!! i also adored your sleeping beauty cake! last month was my first challenge, so we are newbies together. i’m running behind today, so i bet i’ll end up posting a few minutes before midnight. haha.

  12. sleepingbearinthekitchen says:

    For one who lost sleep it appears you were wide awake enough to create such fantastic braids!!! Wonderful first challenge and Welcome!!!!!

  13. I’ve often thought about joining the Daring & Crazy bakers. Such challenges at times. You did such a wonderful job. It looked hard to make for sure, but your pics came out perfect.

  14. job well done and welcome to the DBers

  15. Welcome to DB! Your braid looks so pretty, and the topping looks delicious!

  16. Yours looks so lovely :). I love the filling too 🙂

  17. Your danish braid looks good! I like the icing on it.

  18. Fabulous braid! Welcome to daring bakers, I’ve been on board for about 6 months now, it’s been great!

  19. your braids look lovely! this was the first month for me too & wow was it a challenging one, huh

  20. Welcome! What a gorgeous braid. I love the glaze and I’m so wishing I had added one to mine. Congrats on your first challenge.

  21. PAT A BAKE says:

    Beautiful looking braid. Gr8 job on your first challenge…pat, pat pat….. Loved the tinnie one for your hubs which said eat me !.

  22. Speedbump Kitchen says:

    Congratulations on your first challenge! It looks wonderful! I also loved the princess cake…we did a double princess birthday for my girls last year and the princess obsession is still going strong, so we may be doing princesses again!

  23. Oh My, Maple! Awesome job!

  24. Welcome to the Daring Bakers!

    I’m so glad to see that you joined!

    Your photos are gorgeous! Excellent job!!

  25. Just stunning!! Mine is all gone and wishing I could have a bite just about now! 🙂

  26. The Danish braid looks beautiful and I love the idea of guava filling.

  27. LOL, you sound like my husband when he gets started on something he can’t stop (but usually it has something to do with the computer, not the kitchen). But anyway, great job, they look fantastic and delish! Welcome to the DB 🙂

  28. onespicymama says:

    How beautiful! What a great first Daring Bakers challenge!

  29. I am always tempted to join Daring Bakers. And I think I might now. The Opera cake scared me too.

  30. Beautiful pastries, all of them!

  31. kellypea says:

    Excellent photos. I love your enthusiasm. I agree that sometimes, thinking about all of this when we’re sleeping is a bit much, but I get it. Congrats on your first challenge!

  32. madcapcupcake says:

    Congrats on a fantastic job on your first challenge – looks delish, LOVE the maple idea 🙂

  33. What a great job you did on your first challenge!! I love the little “eat me” danishes..so cute!
    You really have to make the Opera cake in your spare time..it was delicious and really extended all our abilities! That’s what’s so great about these challenges!!
    Congratulations!

  34. Great work on your first challenge! Your braids look beautiful. I also really like the little pastries you made for your husband. How cute!

  35. Sweet Tooth says:

    Well done first challenge! The dough looks really flaky.

    Alexandra

  36. Sweet tooth…

    thank you!!!

  37. Dhanggit says:

    this danish braid is beautiful and sexy !! just like the baker hehehe

  38. Jigginjessica says:

    Congrats on your first challenge. It looks beautiful!

  39. Yummmmm! I didn’t get to do this challenge in time (boo…) but I am definitely going to get around to it! Yours looks awsesome. 🙂

    Oh, and you asked me a question on my blog a while back that I haven’t had a chance to answer (sorry – I wasn’t ignoring you)! The pic at the top of my site is this park in Torino (Turin), Italy. My hubby and I visited in ’06 and several of us were coming back from a walking tour of old town Torino. Unfortunately our daughter was back in the States with her grandparents or I’d have taken up residence in Europe! Sigh. ;>